Quick tips and tricks in MYOB Exo: Part 2
5 more Tips and Tricks to enhance your use of MYOB Exo.Welcome to Part 2 of MYOB Exo Quick Tips and Tricks! Our goal at Kilimanjaro is to ensure MYOB Exo users are making the most out of their software to reach the full potential of the system. Have you read Part 1 of our quick tips? Read more and learn how to optimise your use of MYOB Exo in minutes! Need more support or training? Click the link here.
Quick Tip Six: Shortcut links to multi databases
You can store your Exo Business database name and username in your ‘Exo Shortcut’ so it will always default to the right database and username. Right-click on the shortcut and select Properties. This saves time when opening your MYOB Exo system, as it will default to the selected database.

Quick Tip Seven: Custom column settings
In most Exo Grids, the columns can be rearranged to suit your preference. Drag them to a new position and right-click on the blue ‘Headings’ row to save the settings. You can also add or remove fields using ‘Select visible columns’.

Quick Tip Eight: Edit transaction dates
Transaction dates: If you right click on the General Ledger Transactions tab and go to ‘Edit transaction references’ you can easily change the date of the transaction.

Quick Tip Nine: Shortcut Keys
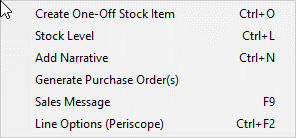
- Instead of right-clicking to add a line Narrative, Ctrl + N will open the line Narrative window for the selected line.
- Once in the Narrative Screen, you can enter Ctrl + ‘ to Activate the Common Phrases function
- When you wish to insert a new line, simply use the Insert shortcut key. Note that this will only apply if you are in the product entry lines screen
- On the Sales Order Entry Screen, you can enter Ctrl + O to create a one-off stock item
- Ctrl+ T in a narrative or notes window will insert current date & time and the name of the logged in user
- Right Clicking In Exo will sometimes show you what the available shortcuts are on that area of the screen
Quick Tip Ten: Inserting and deleting rows
You can insert a row into an Exo grid by clicking on the line beneath the line you want to insert, and pressing the Insert key on your keyboard.

Are you using the latest version of MYOB Exo?
MYOB Exo has a long and rich history, from its early days as ExoNet up to the latest releases. Each new version adds new features and functions to your already powerful system. The latest update to the software will always give you benefits over the older versions. Added functionality may be as simple as an improved workflow, a new widget, a tidier report, or more complex functionality like Bank Feeds. Access to these features is included in your Annual Licence Fee (ALF), so you are missing out on added value by not keeping your system up to date. By regularly updating your software, you ensure your team maintains a reliable, powerful platform to suit your organisation for years to come.
Visit our MYOB Exo Version History page to read all the latest updates and features.
If you have any enquiries please call us on 1300 857 464 (AU) or 0800 436 774 (NZ) or email us at sales@kilimanjaro-consulting.com.


